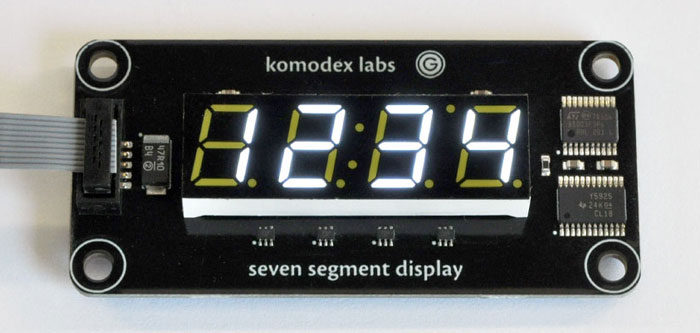
The new Seven Segment Display Module for Netduino Go from Komodex Labs is now shipping! This module features four 7-segment LED digits and can be used to display many types of data including sensor readouts, times, temperatures, and much more.

Drivers
The drivers for this module can be downloaded from the Komodex Labs Downloads page.
If you want to check out some demos, open the Visual Studio solution file included with the source code and press F5 to deploy the sample application to your Netduino Go. You can press the button on the Netduino Go mainboard to cycle between the different display demos.
Using the Display
To use the display in your own projects, first add a reference to the Komodex.NETMF.SevenSegmentDisplay.dll assembly within your project. If you have the Komodex Module Drivers package installed, you can simply right click on “References” within your project and select “Add Reference…” to find this assembly.
At the top of your program file, insert the following line near the other using statements:
using Komodex.NETMF;
Similar to other go!bus modules, you can instantiate a Seven Segment Display as follows:
SevenSegmentDisplay display = new SevenSegmentDisplay();
The SevenSegmentDisplay class has several methods for controlling the behavior of the display. The SetValue method is used to set the actual value that appears on the module. SetValue has several overrides for use with different data types.
Integer Values
| Action and Code | Result |
|---|---|
Set integer value
display.SetValue(123);
|
 |
Show leading zeros
display.SetValue(123, true);
|
 |
Negative integers
display.SetValue(-123);
|
 |
Multiple Ints
You can use four different ints to set the value on each digit manually.
| Action and Code | Result |
|---|---|
Set value with multiple ints
display.SetValue(1, 2, 3, 4);
|
 |
Use -1 to display a blank digit
display.SetValue(1, 2, 3, -1);
|
 |
Floats
Positive and negative floating point numbers can be displayed with a specified number of decimal places.
| Action and Code | Result |
|---|---|
Display a floating point number
display.SetValue(1.234f, 3);
|
 |
Show only 2 decimal places
display.SetValue(0.987f, 2);
|
 |
Show leading zeros
display.SetValue(0.987f, 2, true);
|
 |
Negative floating point numbers
display.setValue(-1.234f, 2);
|
 |
Raw, Custom Digits
It is possible to send raw values (i.e., specific LED states) for each digit to the display. The Digit enumeration contains several common values including the numbers 0-9 and hexadecimal numbers A-F. It is also possible to cast a number to a Digit to specify custom digits.
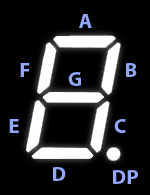
 A custom digit is simply an 8-bit integer. The 7 least significant bits are used for the digit, and the 8th bit is used for the decimal point. The diagram to the left shows the position of each segment.
For example, to display the digit 5, segments A, C, D, F, and G need to be turned on. In binary, this is represented by the number 01101101:
The binary value 01101101 is represented in hex as 0x6D. You can cast this or any custom value to a Digit to display it on the module: (Digit)0x6D.
| Action and Code | Result |
|---|---|
Setting values from the Digit enum
display.SetValue(Digit.Dash, Digit.D1,
  Digit.D9, Digit.C);
|
 |
Use a bitwise OR to add a decimal point
display.SetValue(Digit.Dash, Digit.D1,
    Digit.D9 | Digit.Decimal, Digit.C);
|
 |
Send custom values by casting to a Digit
display.SetValue((Digit)0x7C, (Digit)0x5C,
  (Digit)0x5C, (Digit)0x78);
|
 |
String Values
Strings can also be interpreted and displayed. The string parser understands digits 0-9, hex digits A-F, dashes, decimal points, and spaces. When a decimal point is found, it is appended to the previous digit.
| Action and Code | Result |
|---|---|
Display a string value
display.SetValue("12.34");
|
 |
Decimal points are added automatically
display.SetValue("1.2.3.4.");
|
 |
Use hex digits A-F
display.SetValue("ABCD");
|
 |
Colon and Apostrophe
The colon and apostrophe are controlled independently from the rest of the display. They can be turned on or off at any time without changing the displayed value.
| Action and Code | Result |
|---|---|
Turn colon on
display.SetColon(true);
|
 |
Turn colon off
display.SetColon(false);
|
 |
Turn apostrophe on
display.SetApostrophe(true);
|
 |
Turn apostrophe off
display.SetApostrophe(false);
|
 |
DateTime
The DateTime parser will, by default, show times in 12-hour mode, using the last decimal point as a PM indicator.
| Action and Code | Result |
|---|---|
DateTime value
display.SetColon(true);
display.SetValue(DateTime.Now);
|
 |
Default settings: 12-hour display with PM indicator (decimal point)
// January 1, 2012 at 14:34:00
DateTime dt = new DateTime(2012, 1, 1, 14, 34, 0);
display.SetColon(true);
display.SetValue(dt);
|
 |
12-hour display with no PM indicator
// January 1, 2012 at 14:34:00
DateTime dt = new DateTime(2012, 1, 1, 14, 34, 0);
display.SetColon(true);
display.SetValue(dt, true, false);
|
 |
24-hour display
// January 1, 2012 at 14:34:00
DateTime dt = new DateTime(2012, 1, 1, 14, 34, 0);
display.SetColon(true);
display.SetValue(dt, false);
|
 |
TimeSpan
The TimeSpan parser will automatically choose between displaying hours and minutes or minutes and seconds. If the TimeSpan is less than one hour long, the value will be displayed in mm:ss format. Otherwise, it will be displayed in hh:mm format.
| Action and Code | Result |
|---|---|
Automatic mode: chooses between hh:mm and mm:ss automatically
TimeSpan ts = new TimeSpan(12, 34, 56);
display.SetColon(true);
display.SetValue(ts);
|
 |
Forcing mm:ss display
TimeSpan ts = new TimeSpan(12, 34, 56);
display.SetColon(true);
display.SetValue(ts, TimeSpanDisplayMode.MinuteSecond);
|
 |
Display Brightness
The brightness of the entire display (including the colon, apostrophe, and decimal points) can be modified by sending a floating point value between 0 and 1.
| Action and Code | Result |
|---|---|
Full brightness (1.0f)
display.SetBrightness(1.0f);
display.SetValue(1234);
|
 |
Half brightness (0.5f)
display.SetBrightness(0.5f);
display.SetValue(1234);
|
 |
Display off (0.0f)
display.SetBrightness(0.0f);
display.SetValue(1234);
|
 |
One thought on “Getting Started with the Seven Segment Display Module”